How to make the Kamstrup MULTICAL 403 actually smart
2025-07-08 12:30 CESTWe decided to replace our old oil heating source in our house with a connection to our local heat supply grid.
Therefore, we got a new heat counting device so that the provider can know how much "heat" we got from their grid. The
device we got was the Kamstrup MULTICAL 403 which offers
an interface to read the values via IR. Surely I was genuinely interested in integrating this device into my smart home,
as the following shows you how I've done it.
Here are a few Amazon links to different articles that may help you with your smart home project. These links are affiliate links; this means if you buy something, I get a small share as support for this article.
What you'll need, to read the values from the Kamstrup
-
Raspberry Pi
- I use a Raspberry Pi 4 with 4 GB
- you can use a newer Pi 5 with 4 GB, too
- if you want more RAM, you could get the Pi 5 with 8 GB RAM
- 4 GB should be enough, I run on the 4 GB model Home Assistant, too without any issues
-
I'd suggest to get some passive cooling, like this one
- If you use a Raspberry Pi 5 you could use these cooling metals
-
If you buy a Raspberry Pi you need a power adapter, the same works on a PI 5, too
- alternatively, if you have POE, you could get a POE Splitter for the PI, like I do
-
If you want to mount your Raspberry Pi on the wall
- case for Pi 5
- case for Pi 4
- If you have a 3D printer you can print a case
- USB IR reader
My setup is as follows: I have one Raspberry Pi, which is located directly next to my electricity meter. This Raspberry Pi runs Home Assistant and some other self-hosted applications, and this Raspi has an USB IR reader that is mounted directly to the electricity meter. This is the host of my setup. Home Assistant is a cool application that offers many smart home integrations, even one for the Kamstrup MULTICAL 403, which I show you at the end. The second Raspberry Pi is located next to the Kamstrup device and has also an USB IR reader, which is mounted on the Kamstrup. This Raspi acts as the reader from the heating counter.
Guide
First things first: Install Ubuntu on the Raspberry Pi. All shown commands are done on the latest LTS Ubuntu on a Raspberry Pi.
Now power up your Raspberry Pi with the freshly installed Ubuntu and log in via SSH or hook up a screen to the Raspberry Pi and open the Terminal.
Find out the port where your IR reader is connected
If you have no other USB devices connected to your Raspberry Pi, then surely the port for the IR reader is
/dev/ttyUSB0.
If you have more USB devices connected, then please determine the right USB port by yourself. Please keep in mind that
the order of ttyUSB/dev/serial/by-id/usb-FTDI_FT230X_Basic_UART_D307PBVY-if00-port0.
Get the values via CLI
There is a nice OSS CLI tool - PyKMP - to get the values from the Kamstrup device. Execute the following to install PyKMP:
python -m venv /tmp/venv
source /tmp/venv/bin/activate
pip install -U pip setuptools
pip install PyKMP[tool]
After you installed it you can test retrieval of a value from Kamstrup:
source /tmp/venv/bin/activate
pykmp-tool --serial-device=/dev/ttyUSB0 -vv get-serial
The first command you must always execute to change into a mode where you can access the pykmp-tool. The
pykmp-tool should bring you a result like this:
Meter serial is: XXXXXXXX
To get the actual values, you need to read the registers. They are quite a few registers to read; here are some examples copied from the PyKMP documenation:
pykmp-tool get-register \
--register 60 \
--register 68 \
--register 80 \
--register 74 \
--register 86 \
--register 87 \
--register 266
GetRegister response(s):
60 → Heat Energy (E1) = 0.303 GJ
68 → Volume = 11.388 m³
80 → Current Power = 0.0 kW
74 → Flow = 3 l/h
86 → Temp1 = 61.62 °C
87 → Temp2 = 54.02 °C
266 → E1HighRes = 84208 Wh
The unit of the register 60 could be different on your side. Mine, for example, shows kWh. I think you could change this on the meter itself.
!!! The chance is high that you get not a valid result on the first try, because it's actually challenging to get the IR reader in the right position to read the values successfully. I'll try to give some solutions in the troubleshooting section. !!!Integrate Kamstrup in Home Assistant
If you want a solution where you get a nice overview and charts about your energy consumption, then I'd like to recommend Home Assistant.
In my case this looks like this:
Overview:
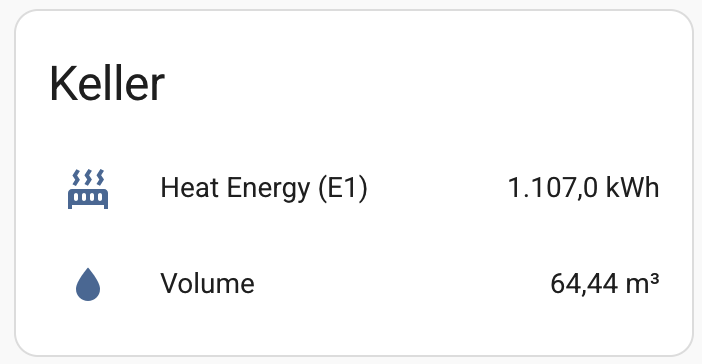
Chart:
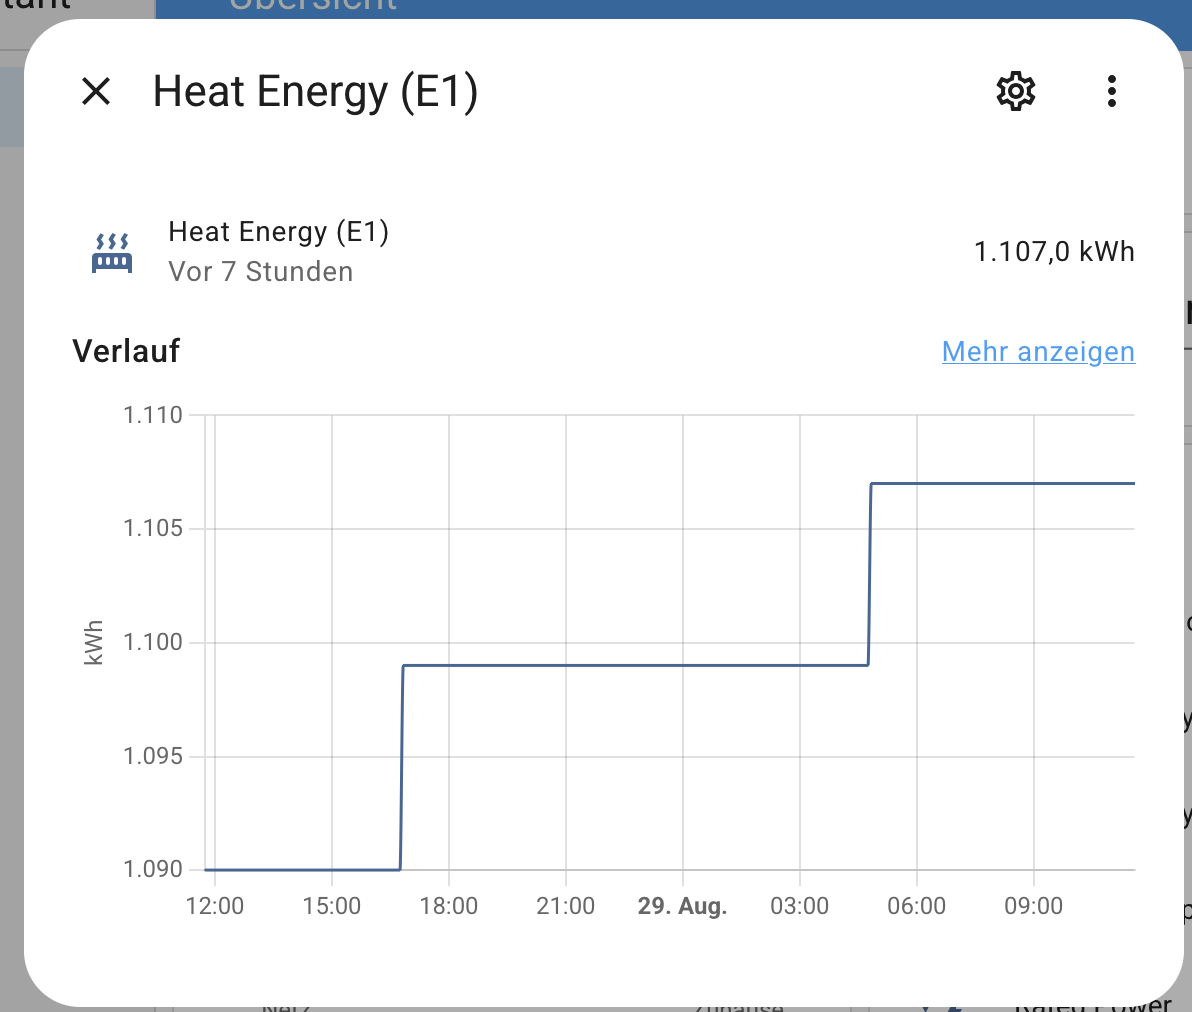
Now back to the guide. First we will need to understand your setup. Do you have another Raspi or other device that is running Home Assitant in your network OR you want to run Home Assistant on the same device that is connected to your Kamstrup?
Same device:I'll recommend not using the Ubuntu image for the Raspberry, as mentioned in the upper guide, use the Home Assistant OS. It's mostly the same, but works better together with Home Assistant. The Home Assistant OS uses Debian, which should behave the same as Ubuntu. This means you can still install PyKMP if you'd like to.
Home Assistant is running on another device:
Now we will need to install ser2net. This opens the serial connection to the IR reader to the network so that you can read the meter from another device that is on the same network.
Login to the Raspi which is connected to the IR reader, and install ser2net:
sudo apt install ser2net
Now we need to configure it. Open the config file with your favorite editor:
sudo nano /etc/ser2net.yml
You can now overwrite the connection block as following:
connection: &mykamstrup
accepter: tcp,2000
connector: >-
serialdev,
/dev/serial/by-id/usb-FTDI_FT230X_Basic_UART_DP0675QP-if00-port0,
1200n82
options:
max-connections: 2
Replace /dev/serial/by-id/usb-FTDI_FT230X_Basic_UART_DP0675QP-if00-port0 with the right device path that you found
out beforehand. Take a look at the section **"Find out the port where your IR reader is connected"**.
Save it, and now restart the ser2net service.
sudo service ser2net restart
!!!! If you started the ser2net service and everything is set up right, then it's not possible to use the USB port
in the PyKMP-tool. You must then always use the device path via network. Something like pykmp-tool
--serial-device=socket://127.0.0.1:2000 -vv get-register --register 60
!!!!
Now set up Home Assistant to retrieve the Kamstrup values:
First install the community Addon Store for Home Assistant called HACS.
If you've done that, then install the "Kamstrup 403" Addon. Open the HACS store by clicking on "HACS" in the sidebar. Type in the search bar "Kamstrup 403" and click on the three dots at the end of the table and choose "Download".
After the addon is installed successfully, you need to activate the device and configure it. Open the settings in
Home Assistant by clicking on Settings in the sidebar.
Then click on "Devices and services", then click on "add integration", search for Kamstrup and click on it.
Now you'll be asked for the serial port.
If the usb reader is locally type in your USB device path. If you installed ser2net and you have to type in the
device path as follows socket://<IP of the raspberry which is connected to the IR reader>:2000 without <>.
Afterwards you should be asked for the room which the values should be connected to, just follow the wizard
and create the right room for the values.
Now everything is set up and you should see the values of the Kamstrup on the dashboard.
Troubleshooting / Good to know
Battery
It's possible that your Kamstrup device is not connected to power. This means it has a battery in it, and it could be possible that you drain the battery really fast if you read the values often. So it is a good practice to read the values maybe every hour or less.
Home Assistant doesn't show any values or "unknown" values
In my case, I have this issue from time to time, too. But it fixes itself with the next run. Just wait an hour or two and see if it's possible that you get any values at any given time. Or you try it by yourself. I highly suggest that you install PyKMP and try to get values by yourself on the CLI to verify that it's possible to retrieve values to exclude a problem with the IR reader.
I can't get any values from Kamstrup
If you installed PyKMP, you can pretty quickly test if the IR reader works. Now, I'll try to explain some error sources.
- I highly suggest that you buy the exact IR reader I mentioned in the beginning of this article, simply because I own the same and I know that this exact model works.
- If you bought the same IR reader, then make sure, that it is mounted as follows (USB Port upper side):
- If you bought another IR reader, then make sure, that a magnet is in the IR reader in the pink circle:
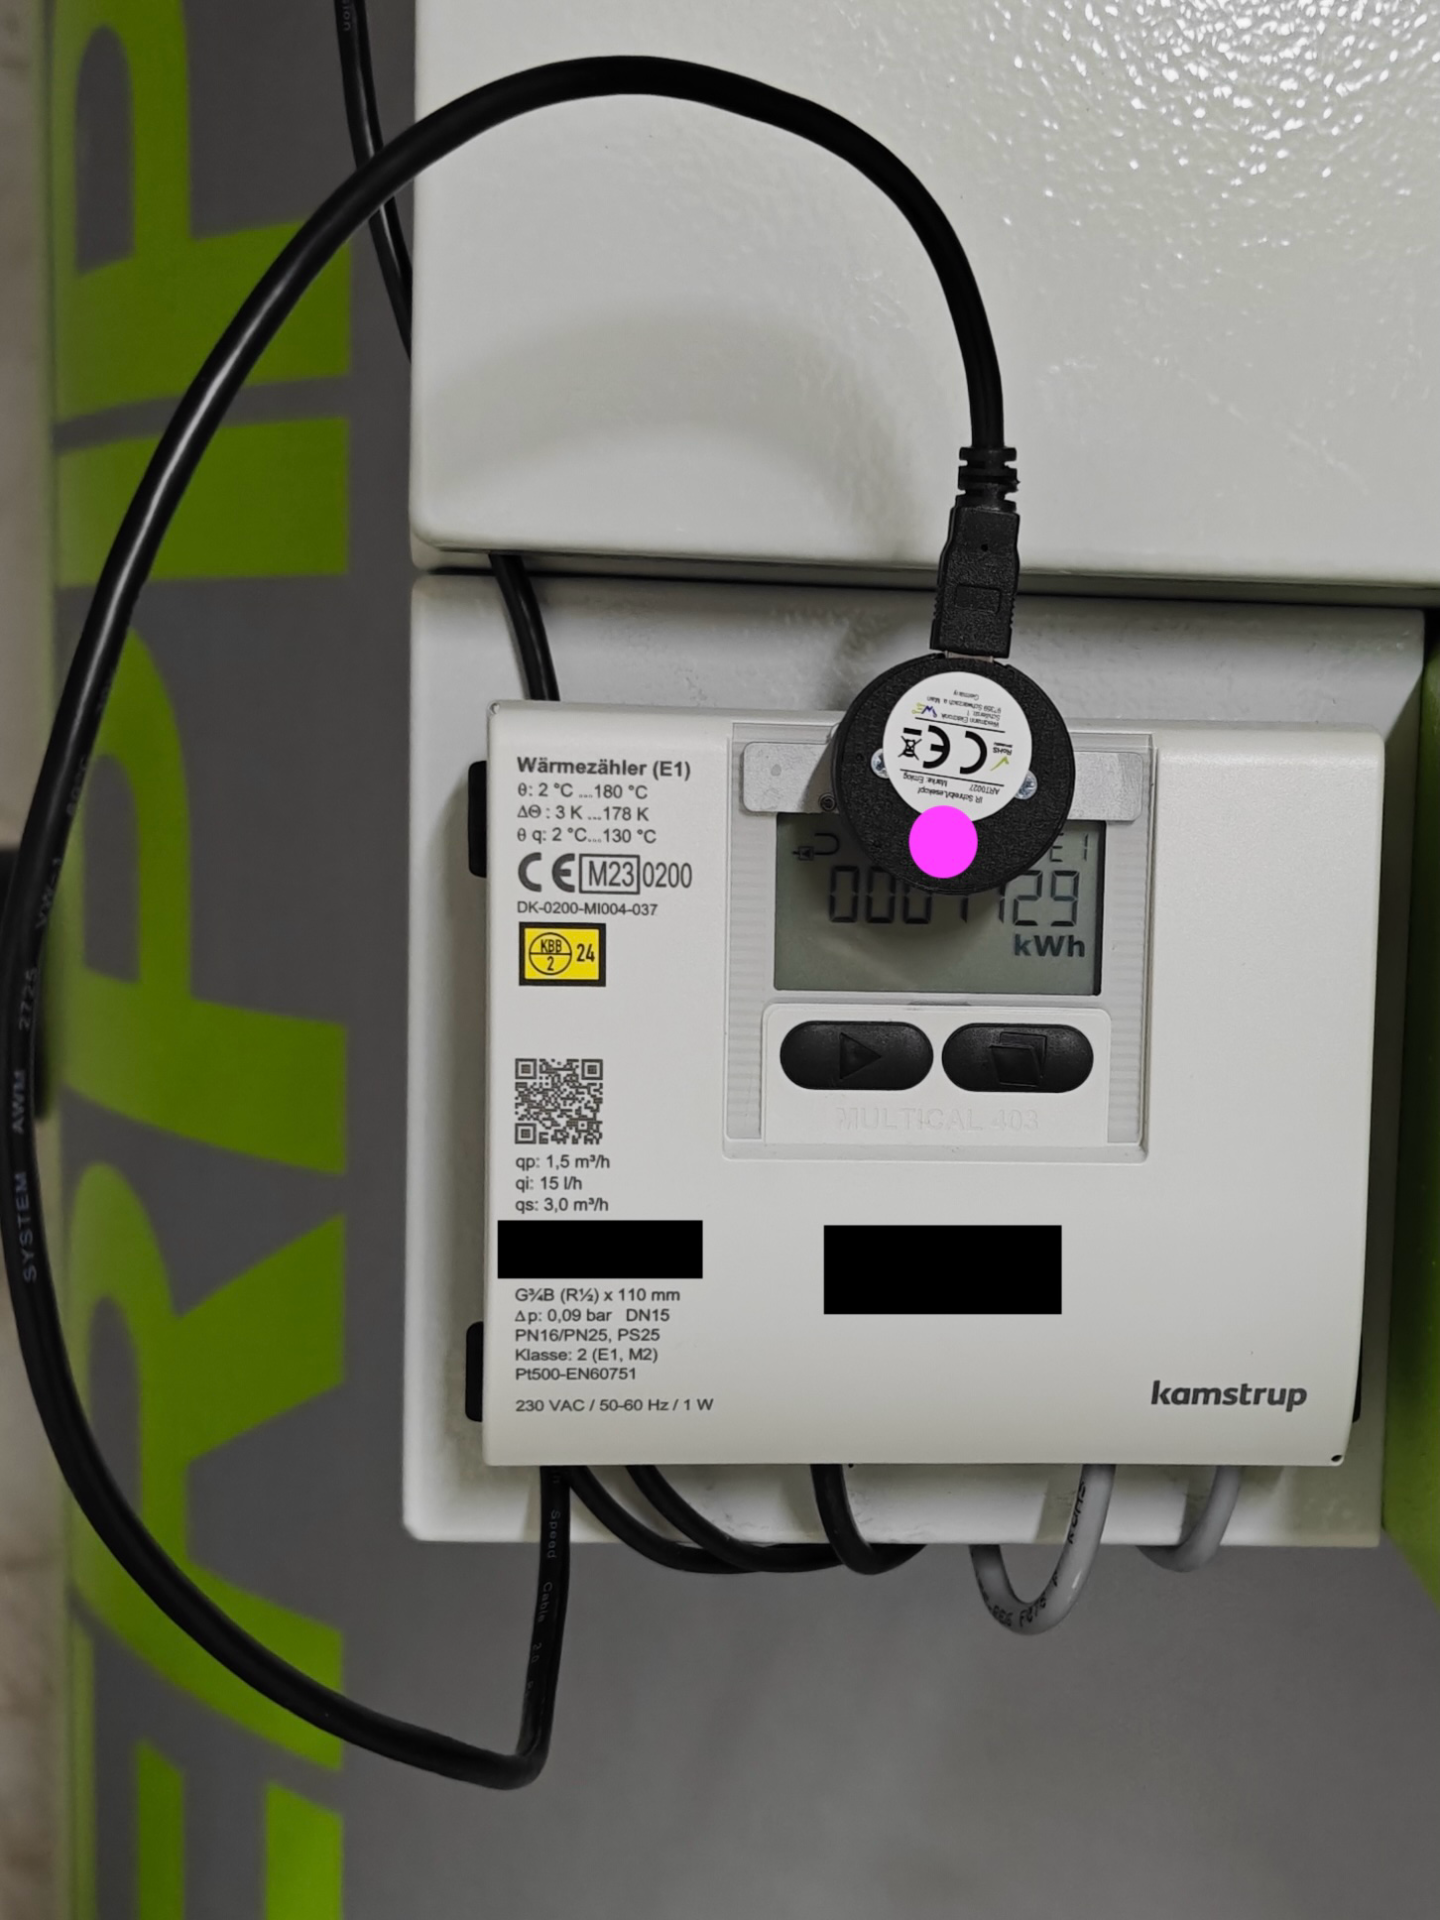 You need on this position a magnet, because this magnet on this position enables the IR transmitting, this
function is per default disabled and gets automatically enabled if a magnet is on this exact position. If
the magnet gets removed, the IR transmission gets automatically disabled after 4 minutes.
It's also possible that the IR reader is wrongly mounted, so try rotating it 180 degrees and check if you're
able to get the values. Please wait after every movement 60 seconds, because the Kamstrup may needs to turn
on IR transmission and this activation needs a few seconds to activate.
You need on this position a magnet, because this magnet on this position enables the IR transmitting, this
function is per default disabled and gets automatically enabled if a magnet is on this exact position. If
the magnet gets removed, the IR transmission gets automatically disabled after 4 minutes.
It's also possible that the IR reader is wrongly mounted, so try rotating it 180 degrees and check if you're
able to get the values. Please wait after every movement 60 seconds, because the Kamstrup may needs to turn
on IR transmission and this activation needs a few seconds to activate.
Please keep in mind, that the position of the ir reader must be very exact and it's challenging to achieve the right position on the first try. There are 3D prints that should help you positioning the ir reader. E.g. this one
Now, I wish you good luck with your smart home project. I hope this article helped you :)